How to install SSL (Let’s Encrypt) with certbot for UBUNTU/DEBIAN/LINUX
- Install Certbot
sudo apt update
sudo apt install certbot
- Obtain a Certificate Manually
Run this to get a cert using the standalone method:
sudo certbot certonly –standalone -d yourdomain.com -d www.yourdomain.com
- This will temporarily spin up its own web server on port 80 to validate the domain.
- Make sure nothing else is running on port 80 during this step.
Follow the prompts to enter your email and accept the terms.
- Where Certbot Puts Your Certificates
Once done, you’ll find the certificates here:
/etc/letsencrypt/live/yourdomain.com/
Files of interest:
- fullchain.pem – Your certificate
- privkey.pem – Your private key
- Configure Your Web Server
Example for Nginx:
server {
listen 443 ssl;
server_name yourdomain.com;ssl_certificate /etc/letsencrypt/live/yourdomain.com/fullchain.pem;
ssl_certificate_key /etc/letsencrypt/live/yourdomain.com/privkey.pem; }
- Renewing Certificates Manually
Certificates are valid for 90 days. Renew manually with:
sudo certbot renew
To test renewal without changes:
sudo certbot renew –dry-run
- Set Up a Cron Job (Optional)
To automate renewal (even in manual mode), add this to your crontab:
sudo crontab -e
Add:
0 3 * * * /usr/bin/certbot renew –quiet
Using Certbot SSL with Docker
Steps Overview
- Use Certbot on the host to generate SSL certs.
- Mount the certs into your Docker container.
- Configure the containerized app (e.g., Nginx, Node.js) to use the mounted certs.
Step 1: Generate Certs on the Host
Run on host (outside Docker):
sudo certbot certonly –standalone -d yourdomain.com
Certs will be stored at:
/etc/letsencrypt/live/yourdomain.com/
Step 2: Docker Compose Setup (e.g., Nginx Reverse Proxy)
Here’s a sample docker-compose.yml for Nginx using mounted certs:
version: ‘3’
services:
nginx:
image: nginx:latest
ports:
– “80:80”
– “443:443”
volumes:
– ./nginx.conf:/etc/nginx/nginx.conf:ro
– /etc/letsencrypt:/etc/letsencrypt:ro
Make sure your app container and Nginx are on the same network if you’re reverse proxying.
Step 3: Nginx Config Example (nginx.conf)
events {}
http {
server {
listen 443 ssl;
server_name yourdomain.com;
ssl_certificate /etc/letsencrypt/live/yourdomain.com/fullchain.pem;
ssl_certificate_key /etc/letsencrypt/live/yourdomain.com/privkey.pem;
location / {
proxy_pass http://your_app:3000;
proxy_set_header Host $host;
proxy_set_header X-Real-IP $remote_addr;
}
}
server {
listen 80;
server_name yourdomain.com;
location / {
return 301 https://$host$request_uri;
}
}
}
Step 4: Automate Renewal (Optional)
Add a cron job to the host to auto-renew:
sudo crontab -e
0 3 * * * certbot renew –post-hook “docker restart nginx”
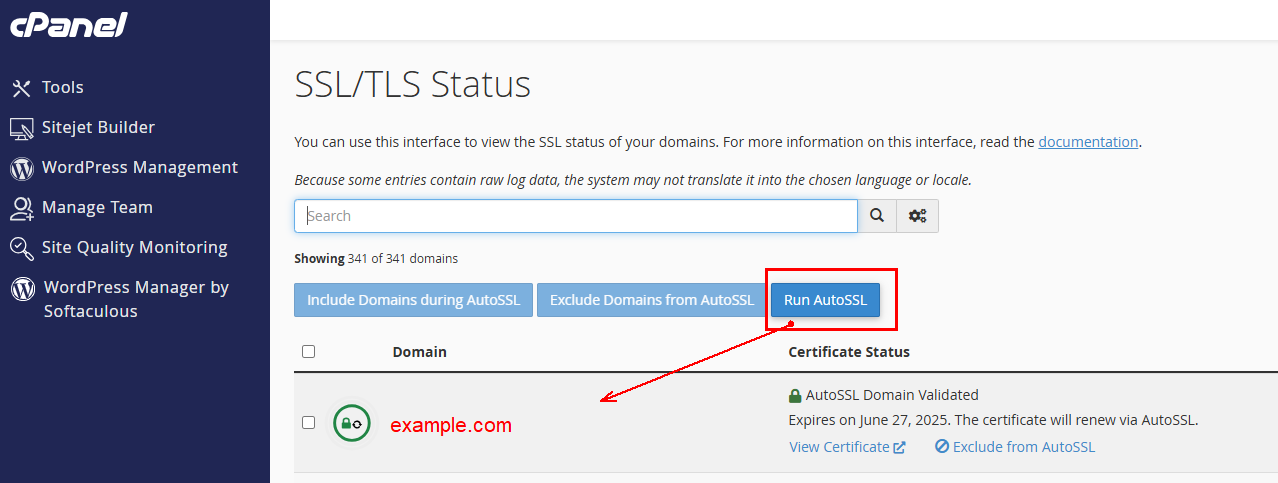
CPANEL automatically add Let’s Encrypt
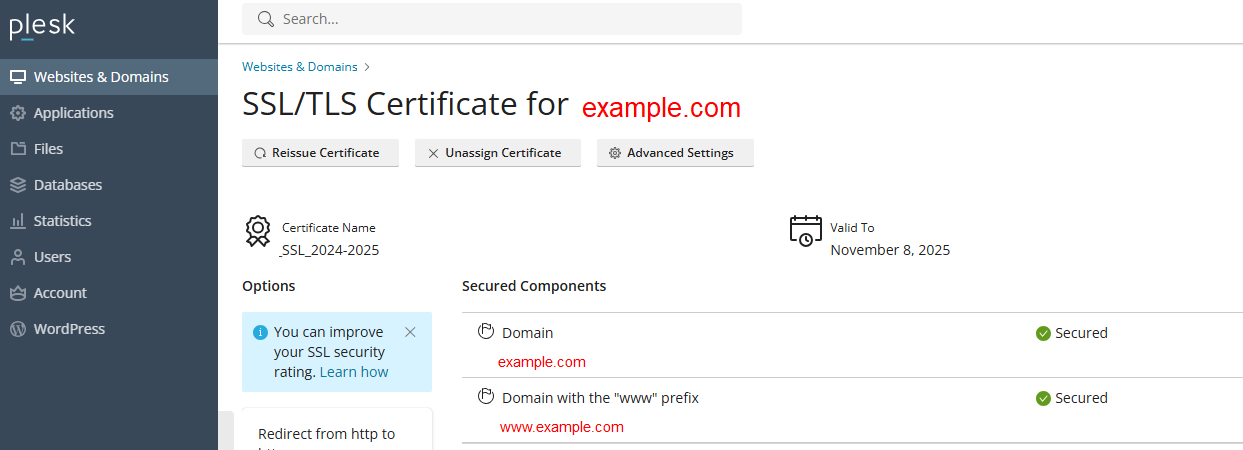
PLESK automatically add Let’s Encrypt